Wednesday, November 28, 2012

Zoya and essie Nail Art - Starting To Feel A Bit Like Christmas!

My 7yr old daughter has been driving me a little crazy the last few weeks with incessant singing and humming of Christmas songs and daily begging for the Christmas tree to go up!

I decided to have a go at extending my Fishnet Stockings manicure for another day or so, by adding another colour just on the tips - I've seen heaps of cool multi-colour french tip mani's on Pinterest lately, so thought I would give it a go - easy nail art in Christmas style.

I wanted something a little sparkly, so I went for Zoya Trixie as it is really opaque and I knew it would go look good with one coat.

zoya trixie silver french tips over essie fishnet stockings


I used Nailene french tip stickers, to get a nice neat line, I haven't had luck with scotch tape manicures yet and these stickers seemed to work pretty well - they're just a bit expensive ($7.95 for 96 guides from priceline).

Xmas nail art zoya trixie tips over essie fishnet stockings


The result was pretty, lovely silver tips, with the right colours, I think this is a super classy look (dark red would look fab with black tips), but given the silver and red together made me think Christmas, I decided to make it even more Christmas-esque.

Christmas Nail Art zoya trixie tips over essie fishnet stockings with essie Shine of the Times Xmas Nail Art


I used essie Shine of the Times as my top coat and these nails ended up Christmas bling-tastic! (well bling-tastic for a non glittery polish type of gal anyway). Probably even a bit too much like Christmas since its November, so it only lasted til the end of the day haha... Maybe I shall try something like this again a bit closer to the actual Christmas celebrations or for our work Christmas party next week :)

xmas nail art: zoya trixie, essie fishnet stockings, essie Shine of the Times


xox

Tuesday, November 27, 2012

essie Fishnet Stockings - My Perfect Red - Swatch and Review

Ahhh essie Fishnet Stockings, could you be my perfect red? So far, its looking pretty good! I have a lot of reds in my collection, so I had not yet used this one, despite buying it a couple of months ago. It is a deep, rich, red cream, probably not so summery, but I saw lots of 'red wine' coloured nails when I was in the US in October and it kind of became my mission while I was there to find a deep red that I loved.


essie Fishnet Stockings Nail Color Review Swatch
essie Fishnet Stockings Full Sun
This is a creme with no shimmer - which I really like, as many of my other reds are shimmery deep reds and as lovely as the sparkle is, I'm a bit over red shimmer. Not only do I adore the shade - it really is perfect against my skin tone, the formula on this is perfection!  This for me was a one coater - my holy grail of nail polish as a time poor single mum + company director! I probably could have been a bit fussy and done a second coat, as there are ever so slight bald spots on some nails visible in bright lights, but I was really thrilled at how good it looked just like this and I can be pretty sure this will be front of stash and in regular use. 
essie Fishnet Stockings Nail Polish Review Swatch
essie - Fishnet Stockings Full Sun

It was sooo easy to apply, went on like butter, so whilst I will still keep trying new things out, cos that is what I like to do, I think I have found my perfect HG red. It is sexy, sophisticated and classy - despite the name lol.

I've got some really minor tipwear after wearing it for a couple of days, but that is pretty common with me and reds/dark polishes, as I do a lot of computer work and am not careful with my nails at all. I might try and  do a gold french tip or something later tonight to try and extend the manicure. I used a base coat, one coat of polish and essie Good To Go topcoat. I noticed some reviews on Make Up Alley said they found they needed multiple coats and it was a little thin, which I didn't find at all, so I do wonder if perhaps I have a newer batch and improved formula? I purchased this at Walgreens in October and it has a white printed essie label on one side, plus the colour name on a spot on the top, which is different to other essie's I have, which have no white label and the colour name on the bottom. Whatever batch it is though, I am in LOVE with it, big thumbs up from me!!! :)


essie Fishnet Stockings Review Swatch
essie Fishnet Stockings - indoor/shade

Brand Name & Colour Rating: Colour 5/5, Formula 5/5 Total 10/10

Part 2 Ulta3 Candy Cane - Greetings From Paradise Swatches and Review

This is Part 2 of the reviews and swatches from the bargain Ulta3 Candy Cane I got a couple of weeks ago at Terry White. You can read Part 1 here.

The second five colours are L-R:

Pink Hibiscus, Acapulco Bliss, Flirty Bikini, Calypso Holiday and Pacific Splash


Ulta3 Candy Cane 2012 Greetings From Paradise Review


Pink Hibiscus


Ulta3 Pink Hibiscus Bottle

This was a lovely hot pink type of colour. It was a really nice creme and I have a few similar colours, but nothing exactly the same. It was the thickest formula of these 5 polishes and whilst it was a two coater and I was happy with that, it was quite hard to apply and didn't self level very well, almost drying too fast as it put it on, as it dragged quite a bit. I wasn't thilled with how it looked on my nails but I think a third coat would have made it too thick on the nail. I shall try it use it again one day though, as it was a pretty colour, just a tricky application for me.


Ulta3 Pink Hibiscus Review Swatch


Ulta3 Candy Cane 2012 Pink Hibiscus Review Swatch


Ulta3 Candy Cane 2012 Greetings from Paradise - Pink Hibiscus Review Swatch

Ulta3 Pink Hibiscus Rating: Colour 3.5/5, Formula 2.5/5 Total 6/10


Acapulco Bliss

Ulta3 Acapulco Bliss Bottle

This was my favourite from the ten bottles. It was a fantastic rich deep pink colour, a creme with a tiny hint of shimmer that was really only obvious in direct light. The formula was good, it was opaque in two coats. I wasn't expecting to like this one as much as I did, and wished that I had swatched it last so I could keep it on - I will definitely be wearing this one soon!

Ulta3 Acapulco Bliss Review Swatch


Ulta3 Candy Cane 2012 Acapulco Bliss Review Swatch


Ulta3 Acapulco Bliss Nail Polish


Ulta3 Candy Cane 2012 Greetings from Paradise - Acapulco Bliss Review Swatch

Ulta3 Acapulco Bliss Rating: Colour 4.5/5, Formula 4/5 Total 8.5/10


Flirty Bikini

Ulta3 Flirty Bikini Bottle

Again this was a really pretty colour, I tend to use a lot of lighter creme colours like this during the week for work, but the formula was a bit hard to work with. It was slightly better than Pink Hibiscus though, just a bit thick and almost like it dries too fast to get it spread out nicely, but it was better once the second coat was on. Shown below is two coats, the second coat was a bit thicker to compensate for the difficulty of spreading and that worked OK.

Ulta3 Flirty Bikini Review Swatch


Ulta3 Candy Cane Flirty Bikini Review Swatch


Ulta3 Flirty Bikini Nail Polish Swatch

Ulta3 Flirty Bikini Rating: Colour 4/5, Formula 2.5/5 Total 6.5/10


Calypso Holiday


Ulta3 Calypso Holiday Bottle

I absolutely love colours like this - this is actually pretty much my favourite colour generally, but I shy away a little from blues, because I don't feel completely confident wearing bright blue polish. I really should just do it though, because it is such a pretty colour. It is a vibrant shimmer bright blue with aqua tones and takes 3 coats to get bottle colour. It is really really sheer on the first coat, it does need the 3 coats, so not sure how much I will use this, as I don't have much patience for drying time. It was 3 easy coats though, the polish went on fairly well, was just very sheer.


Ulta3 Calypso Holiday Review Swatch


Ulta3 Candy Cane Calypso Holiday Review Swatch


Ulta3 Calypso Holiday Nail Polish Review Swatch

Ulta3 Calypso Holiday Rating: Colour 4/5, Formula 3.5/5 Total 7.5/10


Pacific Splash

Ulta3 Pacific Splash Bottle


At the first coat and even the second, I had this polish written off as too sheer and a shade I didn't think that much of. However, when I put that third coat on, I got a big surprise wow, cos it really was stunning. It is a rich, deep shimmery blue and I really loved it! I was almost tempted to leave it on my nails as it was the last colour I swatched, but those three coats! The last coat was pretty thick too and I had heaps of stuff to do, so sitting around waiting for a thick three coat nail polish to fully dry, wasn't going to happen.

Ulta3 Pacific Splash Review Swatch

Ulta3 Candy Cane Pacific Splash Review Swatch

Ulta3 Pacific Splash Nail Polish Review Swatch


Ulta3 Pacific Splash Rating: Colour 4/5, Formula 3/5 Total 7/10


My favourites from these five shades was Acapulco Bliss and I really loved the colour of Pacific Splash, so will need to put that on again on a day when I have some spare time. 

My overall favourite from the ten polishes in the Candy Cane is Acapulco Bliss - love that one and Tangerine Tango, mainly because they are easy two coat polishes. Coral Reef would come in a close third, but all the shades were lovely and ten polishes for $12.95 is a steal even if they are 3 coaters! Get your Ulta3 Candy Cane while you can! :)

xox


Monday, November 26, 2012

You've Got Nail Mail

Don't you love it when you get home from work to find packages waiting? :)

I found two lovely packages waiting for me today, firstly some polishes I ordered from Trans Design. I must admit, after two bad experiences bulk ordering polish from the US in the last six months (had to get lots each time to make up for the postage lol), I was a little reluctant to try it again. I have heard a few of good things about Trans Design, so I thought I would give US online polish ordering one last go. The last two orders, from two separate polish etailers, took forever to arrive and I got no response from their customer service, until suddenly out of the blue, 6 weeks after ordering, they arrived. Both times I thought I had blown my cash and it wasn't a good experience. This package however was just two weeks from ordering to door, especially great given that I put the wrong postcode on the package. So yay Trans Design, big thumbs up from me, I shall be happy to place further orders and increase the size of my essie and China Glaza stashes.

My little mini polish haul comprised:
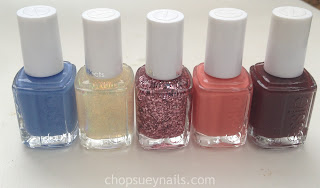
essie L-R
Lapiz of Luxury, Shine of the Times (purchased elsewhere see below), A Cut Above, Carousel Coral, and Bordeaux
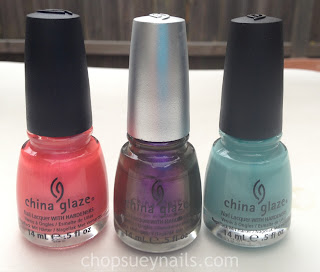


China Glaze L-R
Flirty Tankini, No Plain Jane, For Audrey


plus some new brands to try out:
Orly You're Blushing and Colour Club Sparkle and Soar


I also got a glass nail file and some brushes.

All were well packaged and given how cheap the polishes are at Trans Design - well worth the $23 postage! You can get 9 polishes for $23 shipping, over that and the shipping quotes are crazy high.


My other package was from a great Australian cosmetics company that I have bought from a few times 
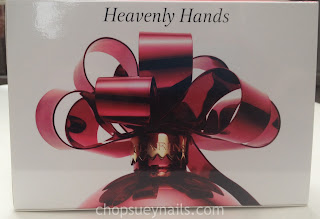
Facial Company. I mainly use Clarins skincare and I adore the Clarins Hand and Nail Cream, so when I saw a great Christmas deal, I decided to stock up!


For $34.40 (usually $40 at other Clarins retailers), you can get 3 x 50ml size of the cream that normally retails for $30 for 100ml. I got two Heavenly Hands packs - so 6 tubes all together, so I can always keep some handy, at work, in the car, in my handbag etc. The 50ml size is perfect for handbags, I actually prefer it over the 100ml size, so I loved this deal!  I might give a couple of the creams away  in Christmas pressies, I shall decide closer to the time.


Facial Company also sell essie and I was so thrilled to find Shine of the Times in stock, after looking for it unsuccessfully for quite some time. I'm not really into the big glitterbombs etc - they are a bit too blingy for me, but this is really cool, a subtle bit of awesomeness and I 'm looking forward to trying it out. I must say, I have pretty high standards when it comes to shopping online and these guys are pretty fantastic - quick turnaround and delivery, good prices and great customer service, I highly recommend them :)

Yay for nail mail! I've got a couple more packages on route, which I am very excited about - some Ulta3 - including Earl Grey which I gave up bin diving for and bought online at Pharmacy Direct, some dotting tools and flocking powder from Born Pretty and some Cult Nails pretties - that is the package I am looking forward to the most!

xox

Sunday, November 25, 2012

More gradient fun with OPI, Zoya and essie!

Chop Suey Nails: Gradient Nail Art OPI, Zoya, Essie


I decided to have another go at doing a gradient, after a massive big fail at doing a cool striped tape manicure over my last gradient. For some reason when I painted the dark colour over the tape (Lincoln Park After Dark), the tape underneath didn't peel off, it just broke, so I ended up with a giant mess on my nails and only bits of stripes. I shall have to try that technique again and perhaps figure out what I did wrong...

Anyway, whilst I still think I need a lot of practice with doing gradients, I was quite happy with how this one turned out :) I chose colours that were a bit more different from each other this time, so I could see the gradient effect more.
Chop Suey Nails: Gradient Nail Art OPI, Zoya, essie


My base colour was OPI Thanks A Windmillion, graduating to Zoya Zuza and Essie Dive Bar on the tips.

Gradient Nail Art OPI, Zoya, essie

I had the sponge much wetter with polish this time, possibly a bit too much for the first nail, but at least I didn't get the annoying bits of sponge coming off on the nails.

Chop Suey Nails: Gradient Nail Art OPI, Zoya, Essie


I found some acetone at Bunnings as well - a little frustrating that you can't get pure acetone at any normal shops or pharmacies - or even Price Attack which has a huge polish section, but at least I have some now. It was still a bit of a mission to do the clean up, but it was much quicker and easier than last time with normal remover.

I am definitely going to have lots of fun playing around with this technique, trying out how different colours work with each other and trying out some fun combos!

xox

Saturday, November 24, 2012

Zoya Sponged Gradient Nails - Summertime

Zoya Maya and Zoya Areej Sponge Gradient Nail Art


I have been quite keen to get the hang of doing gradients after lusting after so many lately. I think gradients feature pretty highly on my Pinterest Nail drool board...

Given it was my first proper go at it, I wanted to do something that was a bit more on the subtle side, so I went for a base of one of my favourite summer corals - Zoya Maya. I did two coats of that, then when that was dry started the sponging.

I decided to paint on to the sponge this time, as last time I did it, I put polish on to some tin foil, then put the sponge on that, then dabbed on my nail and it wasn't quite as successful as I had hoped, so this time I painted directly to the sponge then dabbed on my nail.

Zoya Maya and Zoya Areej Sponge Gradient Nail Art


I did 3 colours, Zoya Maya closest to the cuticle, then OPI Strawberry Margarita, then Zoya Areej. I decided to use Strawberry Margarita in the middle of the two others, so the colour change would be a bit more subtle, but I think just using the two colours would have made a third mixed colour in the middle anyway. The colour change ended up a bit more subtle that I expected, especially as the extra coat of Maya darkened up the bottom of the nail a bit, but I'm pretty happy with the final outcome, as it is still really pretty.


Zoya Maya and Zoya Areej Sponge Gradient Nail Art


One thing before I try this again though, I will definitely be getting some 100% acetone when I can find it (not managed to find it at any chemist yet), as the clean up on this took ages and as you can see, is still a bit messy! I watched an online video tutorial from More Nail Polish and it seemed to be a fairly quick process to mop up the excess all over the nail, but I suspect because I am using normal nail polish remover it isn't quite as quick and easy... I think it took longer to clean up - especially on my right hand - than it did to do the entire manicure - it was at least half an hour trying to get polish off my fingers.

Zoya Maya and Zoya Areej Sponge Gradient Nail ArtAnother trick for new players was how to get the sponging right. I found a few tiny bits of sponge broke off on to the nail (there is a bit in the middle of my ring finger), which I suspect was when the sponge was too dry, so I will be more careful with that next time and keep a bit more polish on the sponge.

I'm excited though, the end result was cool and can't wait to experiment with heaps more gradient colours!

xox


Wednesday, November 21, 2012

A Surprise Little Bottle of Magic - Max Factor Sunny Pink

A few months ago, I was checking out polishes in Big W and spotted a little section of the Max Factor display that had tiny mini bottles on clearance for 72 cents! There were only 3 colours, so I grabbed one of each, not really expecting much for 72 cents, but quite pleased with my little bargain. I did a quick swatch them on all of my nails when I got home and whilst I thought Sunny Pink was a rather cool colour, as it had a bit of a colour shift from kinda pink/lilac to gold, it was so sheer, that I put it away and didn't think much more about it.

Last week I decided to splash out on my first Cult Nails purchase and I was checking out swatches of the Deceptive Collection at Let Them Have Polish and the colour change top coats made me think of that little Max Factor bottle I had stashed away and I wondered if it was a similar concept.

Well I had the perfect opportunity to try it today, when I got up this morning and went to photograph the Revlon Marmalade manicure I put on the night before for a swatch post and realised that it mustn't have been dry enough before bed and it had sheet marks. I didn't have time to re-do my nails before work, so I thought maybe I can put a top coat of Sunny Pink on to cover the marks and suss out the shift.


And it was super cool! It turned the rich orange colour into a shimmery gold and the change from just one coat of Sunny "pink" was amazing!


I also had OPI Suzi and the 7 Dusseldorfs on my toes that was due for a change, so I thought I would see how it went with that and blow me down, it changed the bright purple shimmer, to a gold/bronze colour! It was a completely different colour and I was super impressed. As I have a bit of a thing about my feet, I didn't photograph them, I took the Marmalade off later in the day and did something similar here, with Ulta3 Royal Fever, a dark purple. Look how cool the colour change is! Especially cool given it is just one coat of Sunny Pink :)


So if you have this little mini hiding in your collection somewhere, I definitely encourage you to have a play with layering it to see what happens :)

Max Factor Sunny Pink - Colour 4.5/5, Formula 4/5, overall 8.5/10

xox
Related Posts Plugin for WordPress, Blogger...